A short while ago I wrote a post on this site and talked about all the things you need in order to have an affordable blog video setup. We looked at things like what camera you should buy, what video editing software to use, and how to do screencasting and video whiteboards. One of the things I talked about was creating a cheap DIY green screen setup, and today I thought I’d walk you through creating your own in more depth.
I bought a green screen fabric on Amazon a few months ago for around $20, and have done a few green screen videos here and there by pinning it to the wall and then editing the resulting videos using the Chroma Key/green screen dialogue in my favorite video editing software, Sony Vegas Video.
After a while I decided that I wanted a portable green screen stand for the screen to hang from whether I was in the basement, garage or the front yard filming. I found that a stand can cost quite a bit of money, however, upwards of $100-200 for many of them.
Making Your Own DIY Green Screen Stand
Instead of buying a green screen stand I came up with my own DIY green screen stand using 1/2″ PVC pipe and connectors, all for a little more than $10 at my local home improvement store. If you want to create your own, here’s a video tutorial showing how I did it.
Items Needed For Building Your Own Green Screen Stand:
You can get these supplies at just about any home improvement store. I got mine at the Home Depot and Lowes hardware stores in my area.
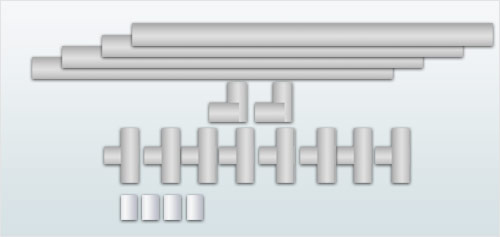
- 4 – 10 foot 1/2″ PVC
- 2 – elbow for joints 1/2″ PVC
- 8 – T joints for 1/2″ PVC
- 4 – end caps for 1/2″ PVC
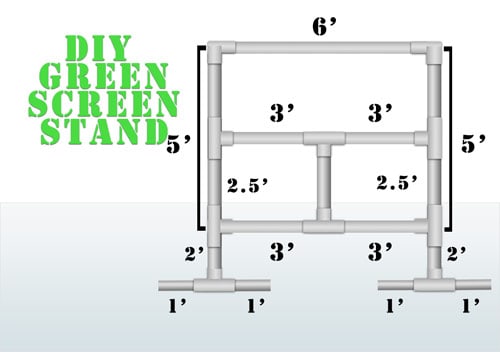
While still at the store, ask an associate to cut the PVC piping down to length for you. Have them cut the first 10 foot piece into two equal 5 foot halves, then cut in half again. The other three ten foot pieces should each be cut into 6 and 4 foot lengths. Then, take two of the 6 foot pieces and cut them in half, 3 foot pieces. Next, you take the first 4 foot piece and cut that into two 2 foot pieces. Next, cut one of the four foot pieces into 2.5 and 1.5 foot lengths. Finally, cut the last 4 foot section into four 1 foot pieces.
When you’re done cutting you should have:
- 1 – 6 foot 1/2″ PVC
- 4 – 3 foot 1/2″ PVC
- 5 – 2.5 foot 1/2″ PVC
- 2 – 2 foot 1/2″ PVC
- 4 – 1 foot 1/2″ PVC
Once you’ve got your PVC tubes cut you just put them together using the elbow joints and t-joint connectors. See the diagram above or the video at the top for details on how that’s done. Basically you’ll have a 6′ top bar for hanging your green 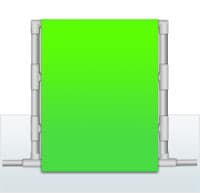
If you want, you can use PVC glue to make the stand more rigid and permanent, or if you prefer leave it unglued for easier dis-assembly and storage.
Once you’re done putting the PVC together you just hang your green screen from the top 6 foot bar, setup your lighting and you’re ready to go.
DIY Lighting For Your Green Screen Setup
One of the key elements of any green screen setup is the lighting. If your green screen isn’t lit well, or has lots of folds and wrinkles you’ll tend to get shadows and uneven coloring in your background. That will lead to awful looking green screen that doesn’t work well in post production.
So how do you light up your green screen? I just use some standard clamp work lights you can buy at any home improvement store for lighting myself up, and then I use a set of bright work lights that I already had for lighting up the green screen.
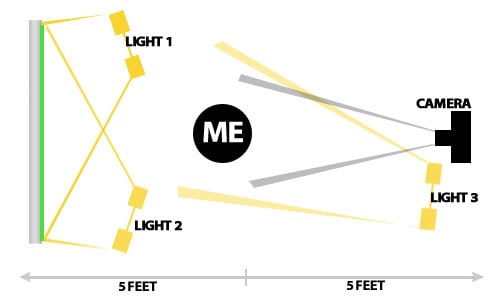
Here’s how I set them up.
So basically you have two lights lighting up the green screen to avoid your worst enemy, shadows. Then I stand 5 feet away from the background to avoid shadows. The camera is about 5 feet in front of me. Then I’ve got a key light to the right of the camera lighting me up. I just use one light stand with two clamp lights on it, but for an optimal setup you can also do a light behind you to give you a bit of a halo, and another dimmer light off to the side.
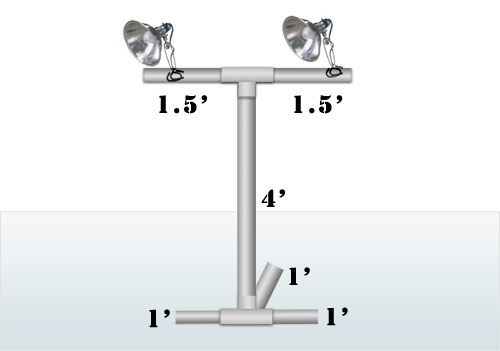
For my main key light I’ve created another do-it-yourself project using PVC pipe and connectors, it’s a DIY light stand!
Here’s all you need in order to create it your own:
- 1 – 10 foot 1/2″ PVC
- 1 – T joint for 1/2″ PVC
- 1 – 4 way T joint 1/2 ” PVC
At the store have your 10 foot piece of PVC cut into pieces of 4 foot, 2 – 1.5 foot and three 1 foot lengths. Put together your stand by inserting three 1′ PVC pieces into the 4 way t joint, and then placing your 4 foot piece upright piecegoing up. On top of the stand you push on the 3 way t joint, and then install a 1.5 foot piece on each side of it. Clamp your work lights to those two cross pieces. If you want, add some diffusing to the lights using parchment paper. All finished!
Cost Of My Green Screen Setup
My DIY green screen setup was very affordable to make, and it does what I need it to. Here’s a breakdown of what I spent on making it:
- $12 PVC parts for green screen stand
- $4 PVC parts for light stand
- $20 for green screen fabric
- $8 for two clamp lights
- $0 for work lights I already had ($30 at Menards new)
So I spent a total of only $44 for my green screen stand, light stand, green screen and lights. It was $74 if you include the price of the work lights that I already had. You could probably do it cheaper by just getting a gallon of green screen paint and painting one of your walls, but it won’t be portable, and for just a bit more, a total of $50-75, you can get entire green screen studio that you can take anywhere!
If you’re delving into the world of video for your blog and are considering doing some green screen work, you might want to give this DIY setup a shot. If you do, let us know how it worked for you, or how you modified the plans for your own needs!


I’m not planning on getting in front of the camera anytime soon, but I’ll be sure to pass this blog post along to my friends who are. Thanks!
Thanks for this very helpful DIY tutorial. I am a middle school technology teacher, and having this set up in class would be awesome!
Glad you found it helpful. The only thing I might have changed if I were re-doing it now would be to use thicker PVC so it wasn’t as flexible. Good luck!
Just finished putting this thing together in my room. Way bigger than i thought it was gonna be tho! (Totally my fault as i wasnt paying too close attention to measurements.) But this thing is awesome. A great alternative if you dont want to spend $100+ on Amazon.
Hi Peter, I’m glad I found your tips on this! I had been messing around for hours trying to get the lighting right, and your top-view graphic was spot on. Thanks!
I appreciate the post and you taking the time to make this but for that I can buy a whole green screen and lighting kit. I got this kit for $81 after the 15% off and 2 other discounts for using a visa card and being a first time buyer there. It’s normal $100. https://jet.com/product/Lighting-Light-Video-Photo-Softbox-Umbrella-Photography-Kit-Backdrop-Muslin/c5e1cfdb0681481ea79a769ffa44d410
Now, I know that’s a bit more than what you said, but you can also get a kit that’s not nearly as good as this one for $65 I believe. Now, I know the kit I bought isn’t going to be the most amazing, but it’s a start. It comes with 4 light stands, 4 bulbs, 2 umbrellas, 2 light boxes, green screen frame with clips and THREE different backgrounds. In my opinion that’s pretty amazing.
Don’t get me wrong though, I think you did a great job and a lot of people have some of those supplies laying around so they could actually make it much cheaper. But for me, if I had the choice to spend $74 dollars to build a very very basic setup, or buy an almost full one thats decent for less, or even 6 dollars more, Id do that.
Again, I appreciate your post, you did a great job. Take care.
While a good idea that I may use on my own, I do NOT agree with making the associates cut ALL OF THESE TO LENGTH. Not only will the cuts be basically general but, you are relying on someone else to make the cuts and trusting that.
Also, making someone cut ALL OF THESE makes you a bit of a j**k off. The poor guy or gal spending the 20 minutes with you cutting these has a 100 other things to do as well as most likely 4 customers behind you.
Get a saw, cut them yourself. It’s super easy and you can buy one from the very same place as the PVC.
It literally took the gentleman 2 minutes to make the cuts since he already had a rig out to measure and cut pipe, and he was happy to do it since it was a slow day. Seems like you may have had a bad experience previously. Sorry for that, but there’s no need to start calling names.
I had the associate cut out all the pieces for me. However, I went on a day that I knew it would be slow, and went later in the evening. I also spoke to the associate ahead of time to let him know that I was working on a project and needed many pieces cut from several 10-foot pieces of PVC. I showed him a picture, and he was more than willing to help. While it did take some time, we talked and joked throughout the whole process.
He also helped me pick out the PVC glue and suggested a paint that would adhere to the PVC.
I made sure to thank him for his help and told the manager how kind and helpful he was to me.
I love this set up. Like another commentor it was much bigger than I anticipated, but same thing I didn’t exactly add up the measurements. I do have a problem though with the stability. I’m not sure of the clothe I am using is too heavy but the set up is still a bit flimsy.
Any suggestions on how I can stabilize it a bit more?