Writing a personal check used to be the go to way to pay for practically everything.
In the past 10-20 years, however, the number of checks paid declined by more than 50-60% according to the Federal Reserve (source).
With debit cards, direct deposit, quick pay programs, and online bill pay, checks are becoming a bit of a relic.
There are still situations, however, where a personal check may be the best payment option, so it is essential to learn how to write a personal check.
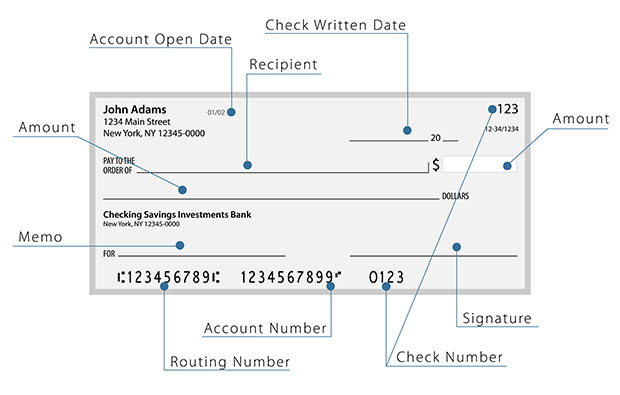
In this article, we will show you how to write a check the right way, explaining the different parts of the check and how to use your check register.
Quick Navigation
How To Write A Personal Check, Step By Step
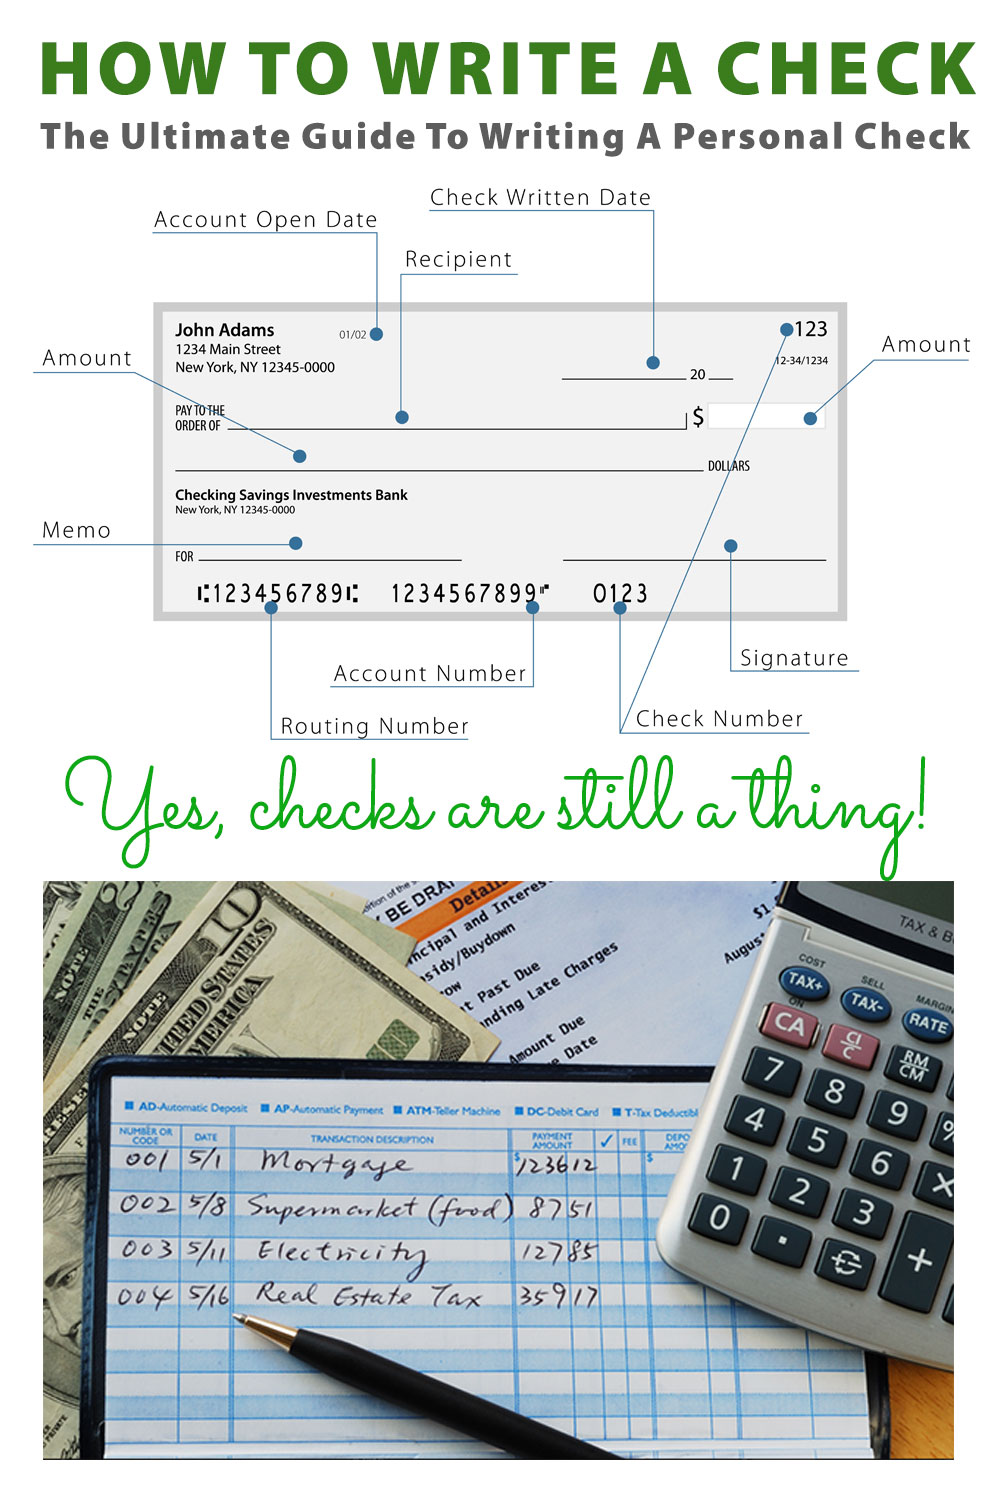
If you’re unfamiliar with checks, all of those lines and spaces can be a little daunting. So, here we’ll take the process of writing a check step by step.
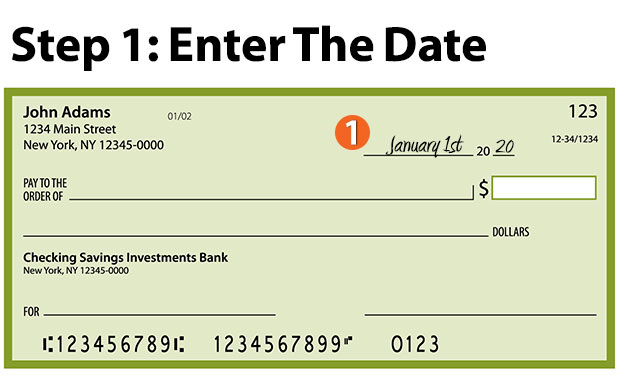
Step 1: Enter The Date
At the top right hand corner of your check, you’ll see a space to fill in the date. In almost all cases, this should be the date you are writing the check, but there are some situations of writing a check where you may “postdate” it.
It doesn’t matter what date format you use, as long as it has the correct day, month, and year.
Step 2: Fill Out The Payee
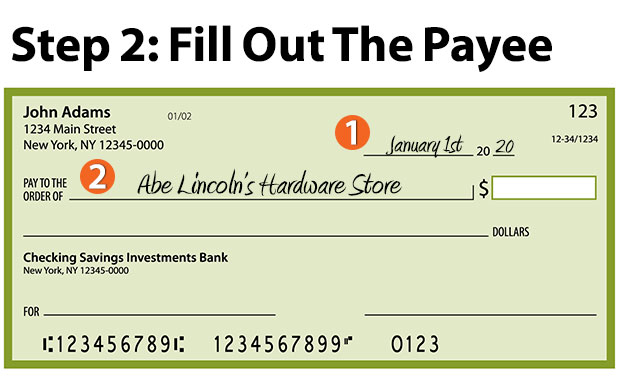
The next step is to fill in the payee details. In most circumstances, this will be the name of a person or business.
You should write this clearly on the line that is marked “Pay to the Order of.” This does not have to be a full name, as you can write “John Smith” or “J Smith,” but for fraud protection, it is a good idea to write a full name.
Step 3: Fill Out The Check Amount
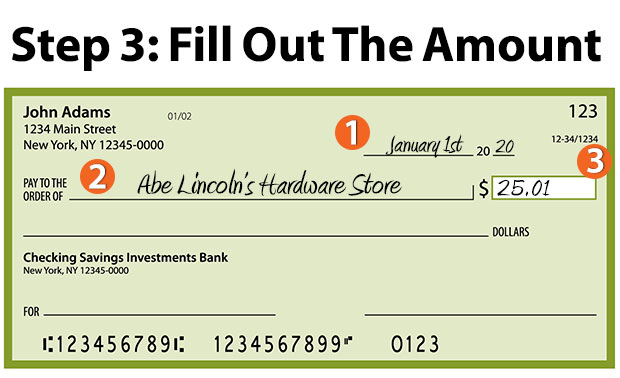
Most checks have an empty box with a dollar sign in front of it directly to the right of the payee line. Once you have filled in the details of who you want to pay, you should fill in the amount you’re paying them.
You will need to write the figures in numbers only, no need to add your own dollar sign.
Be sure to write clearly, so there can be no issues reading the amount of the check. Include dollars and cents inside this box.
You can show the cents in a number of ways. The simplest is to use a decimal point, by writing it like this: $25.01.
Sometimes a decimal point can be confused with a comma in amount field, so to avoid confusion, many people will write their cents as a fraction. For example, like this: $25 01 / 100
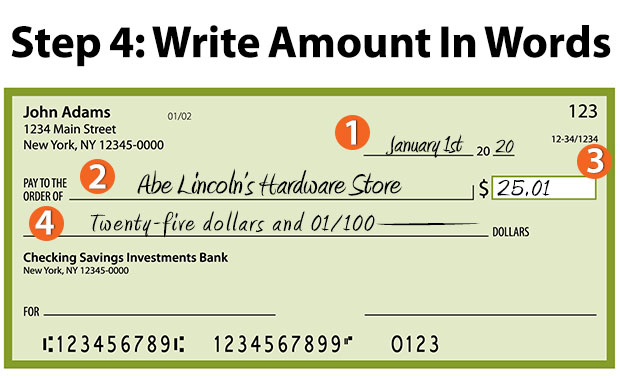
Step 4: Write Out The Amount In Words
Below the payee line, you’ll see that there is another blank line, usually with the word “Dollars” after it. This is where you should write the check amount in words.
By writing the amount in words it provides a double check at your bank, so if there is a problem reading the numbers box, the words provide a back up. In the cases where the words and numbers differ, most banks will use the words to pay the amount of your check.
Try to write the words clearly and include both dollars and cents. Use the word “and” between the dollars and cents only. Many people will write the cents as a fraction here as well.
Remember that you should always hyphenate numbers when you are describing compound numbers between 21 and 99. So in our example below it should be written “Twenty-five dollars”.
If you don’t use the full line to write the amount, draw a line to block out the remainder. This can prevent anyone from adding more words after you have sent the check.
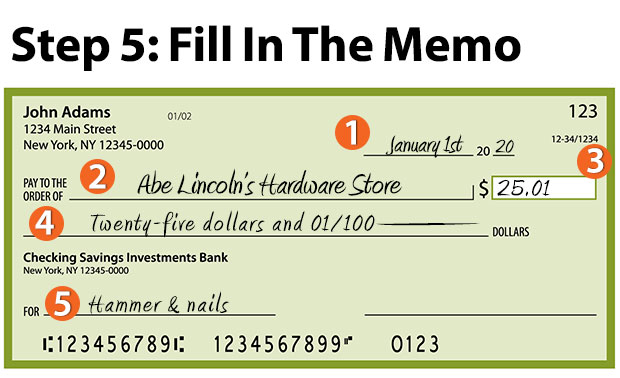
Step 5: Fill in the Memo (Optional)
This is an optional part of the check, but the memo section can be helpful to track your spending. You can write additional information so that everyone can see what the payment is for.
For example, if you’re paying a utility bill, you could write “January Gas Bill” on this line. You could also include your tax ID number if you’re paying federal income tax, or a billing account number. This can be useful in case your check is accidentally separated from your bill, and it can ensure that your payment is still applied to the correct account.
Your check will clear whether there is anything in the memo section or not, but it can be an invaluable feature to help both parties to stay organized.
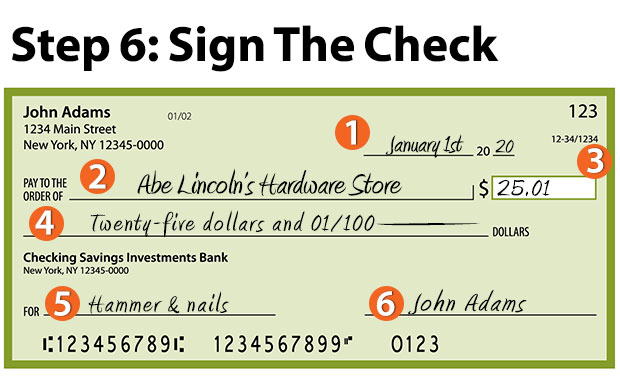
Step 6: Sign The Check On The Signature Line
Finally, you need to sign your name to complete the check. This step is the most important, yet it is the easiest to forget. While a check could still be processed if there is a mistake in another section, a lack of a signature will prevent your bank from processing it, which could result in returned check fees, late fees, or other costs.
The signature section is in the bottom right corner of the check. You just need to sign your name as usual, and the check is complete.
How To Fill Out Your Check Register
Even if you are familiar with how to write a check, many people don’t properly understand the importance of the check register.
Tracking your spending is crucial to achieving healthy finances, and properly managing your check register is a solid start.
Your check register is a record of the checks you have written and can be used to keep track of the checks that have cleared and your available balance. This will enable you to have a better handle on your finances and avoid expensive unauthorized overdraft fees on your account.
You should record each transaction in your check register immediately after you write a check, so you don’t forget any details.
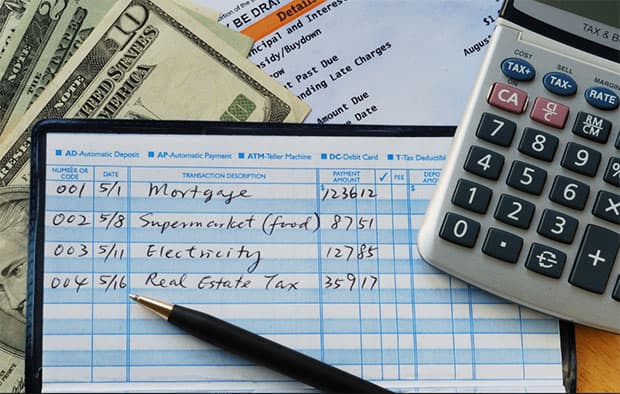
Here are the steps to complete your check register.
Step 1: Enter your starting balance on the first line. This should be the amount that is currently in your checking account in the column that is marked “balance.” Most check registers feature a larger box and a small box, so you should put the dollars and cents separately in each box.
Step 2: On the next line, fill in the check number of the check you wrote in the “check number” column.
Step 3: Working across this line, fill in the date of the check in the date column and the name of the person or company in the “transaction description” column and the amount of the check in the “payment/debit” column.
Step 4: Next, you need to create a new balance in the balance column, subtracting the amount of the check from the balance above. This balance will be different from the balance that is listed on your online account or ATM receipt because the check has not actually cleared yet.
Step 5: Repeat for every transaction. This will help you to keep track of the activity on your checking account.
You will need to include all the transactions made from this account, including ATM withdrawals, deposits, ACH payments, and more. This will help you to be as accurate as possible and avoid any penalties or additional fees.
Step 6: Finally, when you receive your monthly bank statement, identify the checks and transactions that have cleared your account and add a mark in the check mark column.
The Printed Numbers on Your Check
Once you start writing checks, you may start to wonder about the printed numbers that run along the bottom edge of each personal check.
Generally, there are three numbers on each check.
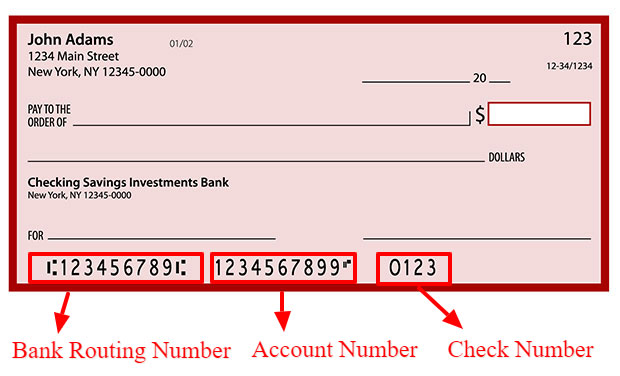
- Bank routing number: This nine digit number, the bank routing number, identifies the bank where your checking account is held, along with other information. It usually appears first on the check.
- Account number: The second number on the check is usually your checking account number.
- Check number: The last number is usually the check number. This will match with the check number printed in the top right corner of your check.
When you’re writing checks and sending each check out for payment, these numbers need to be intact and clearly visible, as they are needed for processing of the check. The machines in banks and financial institutions read these numbers, so even if there is a small staple hole in the number sequence, it can prevent it from being read.
Without these numbers, the payee’s bank will be unable to trace where the money should be drawn from, resulting in a bounced check. So, avoid writing over these numbers or accidentally tearing them off the check.
Frequently Asked Questions About Personal Checks
Since checks are not in as common usage as the past, there are still many people with questions about personal checks. So, here we’ll explore some of the frequently asked questions to help you have confidence whenever you get out your checkbook.
Can You Use A Pencil On A Check?
If you need to write a check in a hurry, you may wonder if reaching for a pencil is a way to write a valid check. While writing a check in pencil is possible, it is not a good idea. Pencil can be erased easily, and someone could change any details that you’ve written. So that small check for a few dollars could be changed to thousands of dollars, while still featuring your signature. For the best protection against fraud, it is important to use permanent ink whenever you even think about writing a check.
When Would I Need A Check?
This depends, but today there aren’t that many scenarios where you must pay with a check. However, there are still companies that don’t allow credit or debit card payments, so a personal check may be the most secure option.
In some scenarios, writing a check may be able to save you some money. Businesses need to pay a fee for processing debit or credit card payments, so if you pay with a personal check you might get a discount. While this may only be a couple of percent, it could add up to a few hundred dollars if you’re making a large purchase. While there are some credit cards that offer reward points, you would need to spend a great deal to rack up those savings.
Can You Write Checks To Yourself?
Although ATMs have made this a little obsolete, you can still write a check to yourself to get cash from your checking account or move money between accounts. If there are no ATMs around, or the machines charge a fee, you can write a check to yourself and endorse it by signing it on the back. Just be sure to wait until you’re at the bank before you endorse your check, as if you lose an endorsed check, someone could cash it, and you would lose the money.
How Do You Postdate Checks?
As we touched on above, you don’t necessarily have to use the current date on your check. Postdating means that you use a future date on your check. This is typically because there is not sufficient money in your checking account to cover the check. Postdating allows you time to put additional funds into your bank account to cover the check.
Generally, while you can postdate checks, it is not a good practice, and you should avoid it. Postdating checks can be a sign that you are not managing your finances as well as you could or that you are spending more than you can afford. Additionally, payees are not required to accept post dated checks, so you may have issues including returned check fees.
What Happens If You Make A Mistake Writing A Check?
While it is important to avoid any mistakes whenever possible, check writing mistakes such as failing to sign, putting the wrong date, or entering different word and number amounts are common. Any mistake on your check that prevents or delays it being processed could potentially cost you money.
If your bank or a business is not able to process the payment, you could incur returned check fees, late fees, or other costs.
How Do You Write A Voided Check?
To process direct withdrawals, direct deposits, automatic bill payments, or other transactions, a business or your employer may require a voided check. This helps to ensure they have access to the correct accounts and can process the transaction without making any mistakes.
Voiding a check is pretty simple to do. You just need to write “VOID” in very large letters across the middle of the check. You can also write void in other spots across the check, as many times as you want to make it clear that this is no longer a good check.
If you need to void a check because you made a mistake writing it, void it and then shred or tear it up.
What Alternatives To Checks Do I Have?
These days there are a lot of alternatives to writing a check that can make your life easier.
- Online bill pay: Most banks will allow you to setup electronic bill pay through their online interface. They’ll pay electronically when possible, or sometimes they’ll print and mail a check.
- Debit and credit cards: Most retailers accept debit and credit cards these days. Even a decade ago that was less common.
- Peer-to-peer payment services: These services (like Venmo, PayPal, Zelle, Google Pay) allow you to send money to friends, family or others. Often they’re free, but sometimes there is a charge, so be sure before you use them.
Of course you can always use cash as well, but be sure to get a receipt!
Knowing How To Write A Check Is Still Important
Knowing how to write a personal check is still important. While many people consider personal checks to be obsolete, a check can still be necessary in a number of scenarios.
Although writing a check is not complicated, making a mistake can cost you money, so it is worth brushing up on your check writing skills, and making sure that you do it right.
Do you still find yourself writing checks for any of your bills?


It’s kind of funny that this kind of post is necessary, but good on you, because it is! Nobody writes checks nowadays except boomers like me. However I have to ask. In addition to writing checks I always understood any number made up of two words that was between 21 and 99 had to be hyphenated. In other words twenty five isn’t a thing, but twenty-five is how you write it?
Yeah, fewer people are writing checks these days so if you’re in your 20s or 30s, you may not know how to write a check if you haven’t had to do it before. The search volume for the term “how to write a check” is actually surprisingly large.
You’re completely right about the hyphenated numbers between twenty-one and ninety-nine. I didn’t write the article but I did create the graphics, which had it incorrect. I believe I’ve corrected it now. Thanks for bringing that up!